Adding users
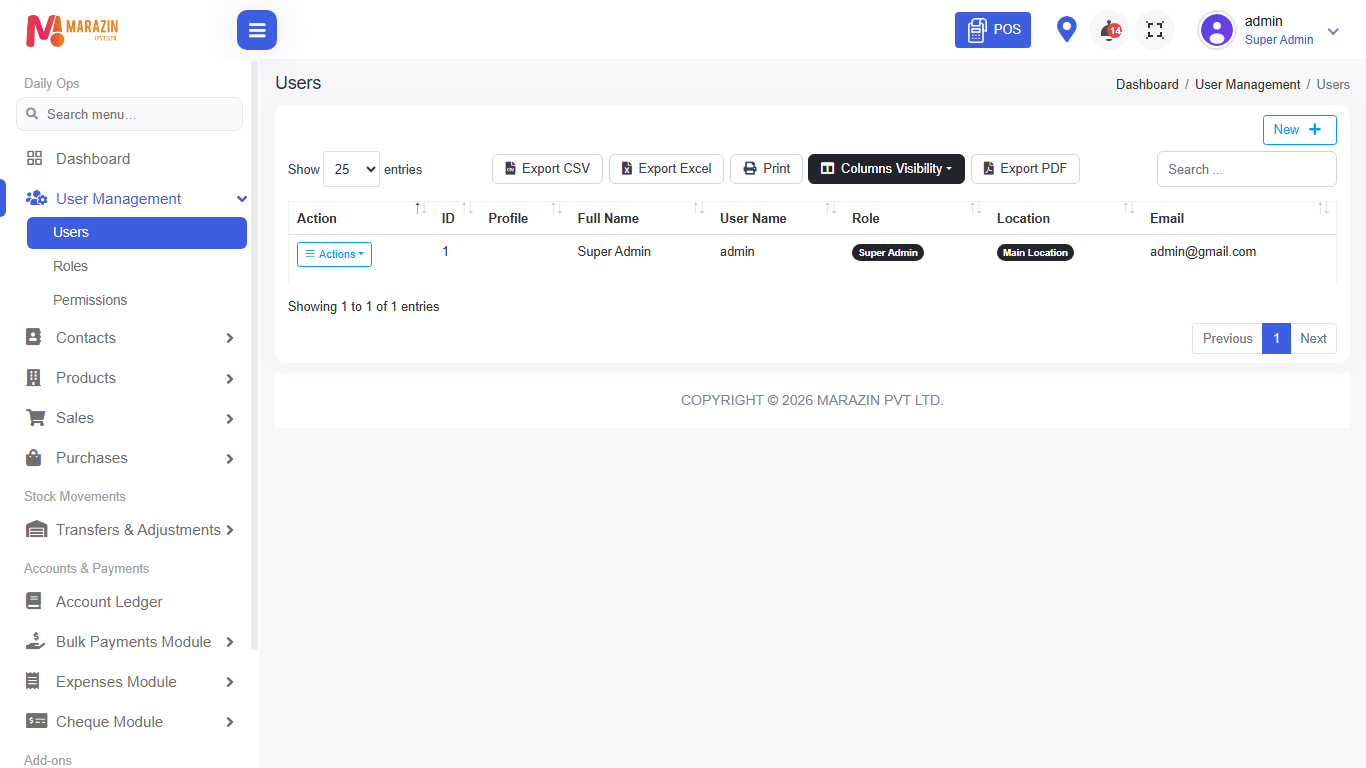
Who can use this: view user to open the list. create user, edit user, delete user, change user password for those actions. Where to find it: User Management > Users
What is this?
A user is a person who can sign in to BillShop. Every user needs:
- A Role — what they are allowed to do
- One or more Locations — which shops they work in
Client quick answers
| Question | Short answer |
|---|---|
| Why give a Role? | Role = permission pack (POS only, or full admin). Without the right role, menus stay hidden. |
| Why give a Location? | User only works in selected shops. Stops seeing other branches’ data. |
| Why multiple locations? | One person works in more than one shop (relief cashier, owner). |
| How to reset password? | Action > Password (manager). There is no forgot-password page. |
Before you start
- Create Locations under Settings > Locations.
- Create a role with the right permissions.
- Know the person’s name, username, and email.
Steps — add a user
-
Open User Management > Users.
-
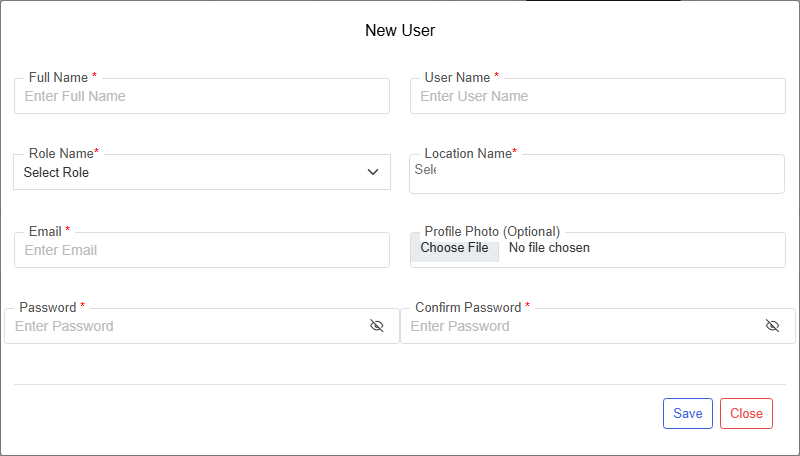
Click New. Window: New User.
-
Fill the fields (see guide below).
-
Click Save.
Why Role?
| Without a good role | With a correct role |
|---|---|
| Cashier sees Settings / delete buttons | Cashier only sees POS + needed menus |
| Mistakes and data risk | Clear job limits |
Examples:
- Cashier → access pos, view own sales
- Store manager → sales, purchases, stock, reports
- Admin → users, settings, features
Always give the smallest role that still lets them work.
Why Location? Why multiple?
| Location setting | Meaning |
|---|---|
| One location | User only works in that shop. |
| Multiple locations | User can switch / work across those shops. |
| No location | Form will not save — location is required. |
Use multiple locations when:
- Owner visits every branch
- Cashier covers two shops
- Warehouse + showroom staff
Field guide
| Field | Required? | What to enter |
|---|---|---|
| Full Name | Yes | Real name. |
| User Name | Yes | Sign-in name. |
| Role Name | Yes | Select Role. |
| Location Name | Yes | Select Locations (one or many). |
| Yes | Contact email. | |
| Profile Photo | No | JPG/PNG. |
| Password | Yes on new | Min 5 characters. |
| Confirm Password | Yes on new | Same password. |
Edit, password, delete
-
Open Action on the row.

-
Edit — change name, role, locations (password hidden here).
-
Password — open Change Password.
-
Delete — only if you are sure.
Examples
A — Counter cashier (one shop)
Role Cashier → Location Main Shop → Save.
B — Manager for two branches
Role Manager → Locations Main + Branch 2 → Save.
C — Password forgotten
Manager opens Users → Action → Password → set new password → user signs in again.
Tips
- Do not share one username for many people.
- After password change, they must sign in again.
- If a menu is missing, fix the role permissions, not only the user.
Common problems
| Problem | Solution |
|---|---|
| Location list empty | Create a location first. |
| Role list empty | Create a role first. |
| User cannot open POS | Role needs access pos. |
| User sees wrong shop | Check Location Name multi-select. |
| Password missing | Need change user password. |